The will be my first video post. In this short clip I explain how my put together my vacuum chamber.
 |
| The abused 3 light question |
There is a popular interview question which claims to make a candidate think ‘outside the box’. It goes something like this.
Suppose there are 3 light switches. There is elsewhere a room with three light bulbs each controlled by one of the aforementioned switches. You cannot see the room from where the switches are located. How do you determine which switch operates which light bulb if you are allowed to visit the room once?
It is answered with the following.
Turn on switches 1 and 2. Wait several minutes. Turn off switch 2. Go into the room. The light which is on is controlled by switch 1. The light which is warm is switch 2 while the room temperature light is switch 3.
While the question may have value in an interview I am not fond of the way it is commonly administered. A typical session with this question might go something like what follows. You can skip this next (somewhat humorous) section if you are familiar with how this question normally runs.
Candidate: Since each light is controlled by one switch I follow the wiring from the switch to the lights.
Interviewer: The wires are covered by walls and ceilings so you can’t see them. Can you think of another solution?
Candidate: I punch holes in the walls and ceilings so I can see the wires.
Interviewer: The walls and ceilings are made of a an indestructible material. Can you think of another solution?
Candidate: I set my cell phone to record video and toss it into the room. I operate each switch in order and then go into the room and review the video on the phone to determine switch order.
Interviewer: But you can only go into the room once.
Candidate: Well you said that I could only visit the room once but never mentioned my phone.
Interviewer: Ok. The room has a door which can only be opened once and shuts immediately once you leave the room never to open again.
Candidate: Hmmm. I disconnect the common wires from the switches and attach signal toners to 2 of them. I then go into the room with a probe and use it to identify which switch goes to which light.
Interviewer: A signal toner?
Candidate: Yeah its a device which transmits a modulating electrical signal over the line which can be detected by a contactless probe. I set the 2 toners to transmit different patterns from each other. The light which does not have a tone is controlled by the switch which doesn’t have a toner on it.
Interviewer: I see. Well lets say the lights and switches do not use wires which transmit electrical signals.
Candidate: Um. Isn’t that is a little bizarre.
Interviewer: Can you think of another solution?
Candidate: I would switch one light and then go outside and look through a window to see which light was on. Since I haven’t visited the room I can do this for each of the switches.
Interviewer: Why do you think this room would have a window?
Candidate: Well most rooms large enough to justify three different lights on three different switches would be too big to fit wholly within the interior volume of a building and most architecture would include windows in any room with an exterior wall. Doing this also helps with fire code.
Interviewer: Well lets say for this example this room has no windows.
Candidate: Alright. I would visit the room first and carefully arrange its furniture to cast specific patterns of shadows based on which light was on.
Interviewer: But the door will close after you leave.
Candidate: That’s fine. The pattern of shadows is oriented so as to be distinguishable from outside the door at ground level. I revisit the outside of the room after operating each of the switches in turn.
Interviewer: But the door is closed.
Candidate: Doors include a gap at the bottom to allow for return ventilation within a building. If the door perfectly sealed it would increase the static pressure experienced in the ducts and place undue stresses on the HVAC’s fan motors. You could have return vents within the room to alleviate this but its more expensive as you need a separate set of ducting to support it.
Interviewer: Why do you think this room wouldn’t have return ducts?
Candidate: Thus far this room is sounding like a terrible place so I am betting it is in a cheaply constructed building.
Interviewer: Well lets say the room has no ducting at all and the door does indeed perfectly seal when closed.
Candidate: Really?
Interviewer: Yes really.
Candidate: <long pause>
Interviewer: Any other ideas?
Candidate: YES! I have it! I am presently engaged in a dungeon crawl in a fantastic world of magic and adventure!
Interviewer: What?
Candidate: Of course, I should have seen it sooner. Where else would you find invincible walls, automatic sealing doors, and lights which don’t use electricity. This must be a challenge I have to solve before advancing. Excellent. I engage my divination powers to search for clues.
Interviewer: No! No! Magic is not the answer either. Its nothing like that.
Candidate: Combat then! You must be the boss fight. Very well I am prepared for battle.
Interviewer: No! You are supposed to use the fact the lights get hot when you run them for a few…
Candidate: SILENCE! Everyone knows magic lights produce no heat. Now, face me you fiend.
Our candidate’s epic fight and acquisition of a quest item which led him to a better job is not the point.
The point is this: If you want a candidate to think outside the box do not build one around him.
Whenever the candidate gives an answer the interviewer responds by restricting the problem space to make the offered solution invalid. The box most interviewers want their candidate to think outside of is being created by the interviewerwith each limit placed to reject a solution which is not the ‘correct’ warm light bulb solution. If you truly want to measure the breath of imaginative thinking a candidate has then you should encourage multiple solutions without restricting the problem.
For example do not say:
“You cannot use a signal toner because of <some restriction> can you think of another solution?”
Simply say:
“Can you think of a different solution?”
This allows the full set of possible solutions to be explored and prevents the interviewer’s biased solution from influencing the candidate.
This is not to say restricting a problem is a bad interview practice. Even in the most broad imaginative thinking exercises some restrictions must exist to provide a context for the answer. These restrictions however should be provided as part of the question in advance and not as a shove in a predetermined direction after an answer is given.
Does this mean there is no place for invalidating a candidates answer via refinement of the question after it is asked? Is there likewise no place for questions with expected answers? No on both counts.
There is a very appropriate place for these questions. If you want to measure a candidates experience in a certain field it is perfectly fine to give a problem for which there is a common industry practice answer. If the candidate responds with a novel solution you may restrict the question to encourage the industry answer. This is done to verify the candidate is familiar with standard practices and not to evaluate creativity. Understanding the differences in the goals of these questions is key to their effective use.
As always feedback is awesome and encouraged.
 |
| Pelican 1750 with mounted plate |
This was a project for my dad. It is a Pelican 1750 case which has attached to it an aluminum plate water jet cut with his initials. Attaching the plate to the case was a bit more challenging than expected, and by ‘a bit’ I mean I spent almost 2 months worrying over it before I was willing to attempt it.
These Pelican cases are made of polypropylene a plastic which has, among its many properties, a low surface energy. Simply put it is hard to get things to stick to it.
In the past I tried a 2 part epoxy, which sticks to most things, on one of these cases and it did not adhere. Not only did it not adhere the cured resin detached from the case with almost no effort. It detached so easy I could have used the epoxy to make a mold of the case.
Eventually I checked the FAQ on the Pelican website (probably should have done this first) which recommended using 3M Scotch-Weld DP 8005. This product is somewhat pricy. I spent, before shipping, a bit more than $1/mL for this stuff. This turned out to be the least of my issues as the cartridge for the Scotch-Weld requires a special gun to apply which is sold separately.
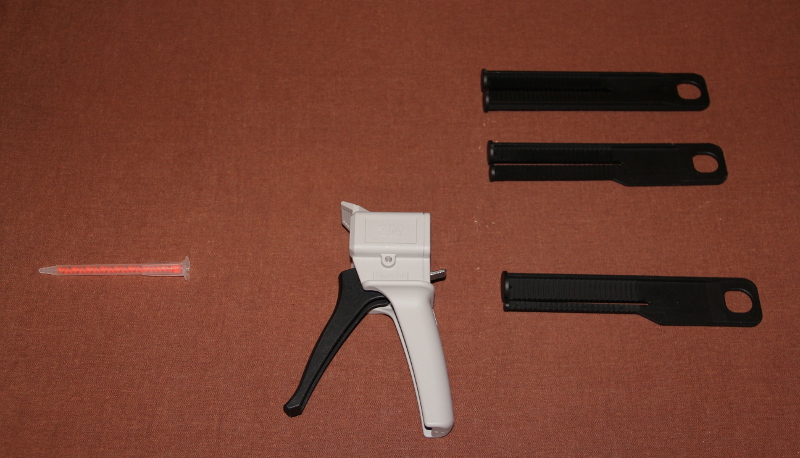 |
| Dispenser for Scotch-Weld Adhesives |
But the gun is just the beginning of your woes. While the gun comes with two plungers (the upper black rods in the photo) neither of them works with the 8005 cartridge. A 10:1 plunger is required (the bottom rod) which also had to be ordered separately. In addition to the gun and the plunger you also need mixing tubes (the clear and red cylinders in the photo). This is the most vexing part. I assumed since the mixing tubes and cartridges are used in a 1:1 ratio and cannot be reused the mixing tube would come with the cartridge. Nope. They are sold separately as well. Maximum vexation achieved.
Mercifully after the scavenger hunt to get the parts it turned out to be easy to use with the only catch being the 8005 has a working time of only 3 minutes. The work area was protected with standard masking tape, the part to be attached was checked and aligned, the adhesive was laid down and then the part was placed and weight applied. It is necessary to support the lid from underneath. When pressure is applied to the plate the force distribution causes the case lid to bow underneath it. This would increase the gap underneath the middle of the plate if the underside of the case lid was not supported.
In the end it worked out well and the adhesive turns out to be rather strong. Hopefully I will have another project for which this 8005 will be necessary. I certainly spent enough on its accouterments so it would be nice to get more than one use from them.
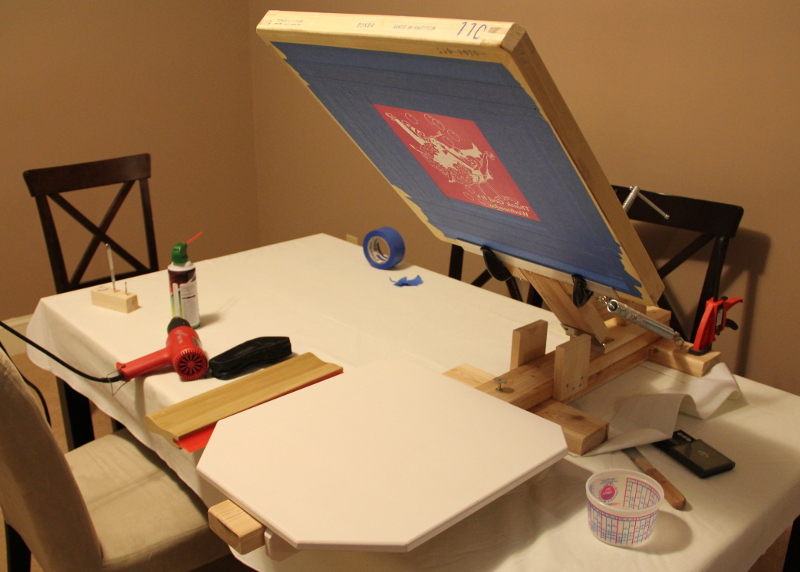 |
| Basic one color diy screen press |
This is my one color screen press. There are many examples of how to build something similar on youtube. The only noteworthy part of this setup is the platen in use.
Keeping the platen in place while printing is rather important. This is occasionally overlooked on one color machines like this one since mostly you will only make one printing pass. In this case I am printing with a discharge ink. For this I will need to alternate printing passes with forced air heating a few times. If the platen moves at any point between these passes the print will be distorted.
The common methods employed to keep a diy platen from moving typically involve using a set screws or lining the inner platen rails with a grippy fabric (which will allow it to move but only with deliberate application of force).
 |
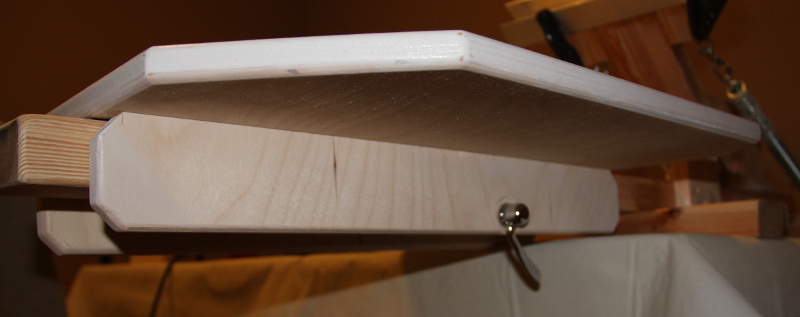
| Underside of the quick release platen |
Neither of these appealed to me so I built this quick release platen. The basic platen shape has two rails attached on the underside. The one in the left of the photo is attached with a door hings which allows it to move. The right side is fixed (with 9 pocket screws). Connecting the two rails is a quick release skewer. This one came from the junk pile at a bike shop (it was formally part of a ruined hub assembly).
The skewer is placed low enough to clear the arm of the printing press. With the lever (on the right) in the open position the nut (on the left) is tightened just shy of causing the hinged rail to touch the printing arm. In this configuration the platen easily moves up and down the arm. When located in the correct position the lever is closed and the platen is securely held in place by the skewer squeezing the printing arm. This prevents the platen from moving up off of the printing arm as well as from moving up or down the arm.
 |
| The (out of focus) lever can be rotated if it is in the way |

What is this picture and why is it representative of failure?
This picture shows my CNC mill in progress. Attached to the table are the supports and linear rails for the x axis. The part being held by the engine hoist (ominously foreshadowing my error) is the gantry. This component would ride the x axis’ rails to move back and forth along the table. The y axis linear rails can be seen attached to the gantry. The z axis and tool holder are not installed in this image.
The heavy steel is very rigid and does not rack even when being driven from only one side with a moderate load at the other. So why is this a failure? The key lies in the aforementioned ‘heavy’ steel. I had intended for the gantry to be installable by a single person. It turns out I am in fact capable of building a gantry so heavy I cannot lift it.
The gantry assembly will likely be installed and removed many times over the course of the mill’s construction. Even using the lift it is very difficult to line up all the parts which need to be attached to each other and damaging the surface of the rails is a very real danger.
So this is a failure of design. The designer (me) failed to take into account the weight of the component which would need to be installed compared to the available resources needed to install it (unfortunately also just me).
I already have the aluminum with which I intend to build the new gantry. Hopefully the new design will work out better though I am not thrilled at the prospect of drilling and tapping all of those holes over again.
An epoxy composite is simply an epoxy resin which has other stuff mixed or laid into it before it hardens. The most familiar composite material made with epoxy is carbon fiber. Though we call the end product a ‘carbon fiber’ item it is more technically a ‘carbon fiber reinforced polymer’ item with the polymer in this case referring to the epoxy resin. Parts made this way are very light for the strength they offer but are expensive.
Reinforcements for polymers are typically cut fiber strands or whole fabric sheets. These relatively large reinforcements are typically ‘laid up’ into a mold and then saturated with resin. I wanted to use other less conventional (and less expensive) materials with epoxy resin as a filler to see what I could create with a specific focus on castable materials. A castable resin mix would need a viscosity low enough to run into and fill the parts of the mold. In addition the filler material would need to address some of the thermal problems encountered when creating thicker parts in epoxy.
As epoxy cures it releases heat. The hotter the epoxy is the faster it cures. These two aspects of thermosetting polymers (including epoxy) limit the thickness which can be cast. If the part is too thick it will not be able to dissipate the heat generated during the curing process resulting in a thermal runaway. In a thermal runaway the heat from curing speeds the curing generating more heat causing a rapid spike in the temperature of the curing resin. The addition of a filler will increase the volume of the epoxy and function as a heat sink to regulate the speed of the reaction.
 |
| Aluminium Filler Epoxy Composite |
Samples created for this experiment were of two sizes. The smaller is approximately 40mL in volume while the larger (such as the above pictured) are approximately 90mL in volume. This first sample is about 50% aluminum powder by volume. When working with fillers it is important to consider how much space the filler will consume as compared to the resin. Since it is troublesome to measure these materials by volume their densities are consulted and the mass to be mixed in is determined which allows the appropriate amount to be scaled out.
Reducing resin volume to less than 60% when using aluminum as a filler significantly increases the viscosity of the mixture making it both more difficult to mix as well as pour.
 |
| Iron Filing Epoxy Composite |
This 90mL sample is 30% iron filings. The iron filings using in this sample came from a set intended for science demonstrations and as such are not particularly fine or cheap. I found sources of powdered iron on ebay later but not in time for this first batch of samples. Air pockets are clearly visible throughout the sample. While none of the samples examined here were vacuumed after mixing the effects of air entrainment are most visible on this sample.
Because of the iron present this sample has ferromagnetic properties though the resin’s presence greatly diminishes them.
 |
| Iron – Aluminium Epoxy Composite |
This 90mL sample is 20% aluminum, 30% iron. The addition of the aluminum seemed to decrease the viscosity of the resultant mix compared to the previous iron sample. Otherwise it is exactly what one would expect compared to the previous iron or aluminum only samples.
 |
| Marble Powder Epoxy Composite |
This 40mL sample is the first of the marble powder samples. Powdered marble makes up 40% of the volume of all the marble samples. All individuals presented with these samples determine them to be some type of stone with a minority guessing them to be marble. None supposed them to be a composite.
After this experiment I discovered cultured marble used in bathroom vanities and many other solid surface countertops are created using a similar process. These samples are different in their use of an epoxy resin as compared to the more conventional polyester resins used in commercial products.
 |
| Marble Powder Epoxy Composite – Black Colorant |
This sample had a black ink added after the mixing of the resin with the marble powder. The contrast is more pronounced in other samples. It is key the colorant not be added until after the resin has been completely mixed. Excessive mixing of the ink into the resin would create a uniform distribution of the colorant removing the striated effect seen.
 |
| Marble Powder Epoxy Composite – Blue and Black Colorant |
Blue and black colorants were used in this sample. Various effects are possible via the manner in which the colorant is added and mixed into the resin as well as how it is poured into its mould.
 |
| Powdered Marble / Marble Chip Epoxy Composite |
This sample was filled with both marble powder and whole pieces of marble in ratios similar to those used for course and fine aggregates in concrete. Both items (the epoxy sample and concrete) are similar as they are both composites of a large aggregate (to take up most of the volume), a fine aggregate (to fill the smaller spaces), and a binder to hold everything together (cement in the case of concrete and epoxy in the case of the sample). The red spots on the sample are the uncleaned remnants of the polishing compound used to polish the marble chips. The marble powder and resin matrix does not seem to respond well to polishing compound though it can be sanded to a relatively fine grit.
For a comparison of how a ‘clear’ resin (one without reinforcements or modifiers) cures compared to a resin with filler consider the following. The 90mL samples discussed above are just over an inch in depth and did not exceed 80F during their curing process. A 90mL block of clear resin cast into the same mould as the above samples exceeded 240F during its curing process. The high temperature experienced during curing caused the piece to deform in its mould. This might be correctable with a rigid mould (the mould used for these samples was a flexible silicon cookie bar mould) but this would likely lead to problematic stresses in the sample.
In conclusion these fillers seem to be capable of allowing epoxy to be used to cast larger parts than normally possible with clear resin. General appearance seems to be highly mutable based on added colorants and fillers. Further tests will be necessary to determine the machinability and general strength of these samples.
For working in soft materials such as paper, softwoods, or plastic you may want to consider a scalpel instead of an X-ACTO knife.
 |
| #11 scalpel blade installed on a #3 handle |
The classic #11 X-ACTO blade has a thickness of 0.02” whereas the comparable #11 scalpel has a thickness of 0.015” making it easier to move though the material it has cut. This narrower blade also makes the scalpel a bit more flexible than the X-ACTO. My experience so far has shown the scalpel to be easier to use when making tight and detailed cuts. They also seem to last as long as my X-ACTOs in similar applications.
The attachment method for an X-ACTO normally involves using a screw to apply compression to the blade to hold it in place. If the user gets an X-ACTO stuck in a piece of material and pulls back with enough force to overcome this compression the blade will leave the handle.
 |
| #11 blade installed on #3 handle |
A scalpel attaches differently. It slides down a grove in the handle and snaps over the end ensuring it is not possible for the blade to come off of the handle without lifting the tab at the back.
 |
| blade installation track on a #3 handle |
Somewhat surprisingly scalpels can be had for cheaper than X-ACTOs. From Amazon a pack of #11 X-ACTOs with 5 blades can be bought for $4.05. The equivalent scalpel, also a #11, can be had in a 100 pack for $17. That works out to an X-ACTO costing $0.81/blade compared to a scalpel at $0.17/blade.
X-ACTO knifes have a numbering scheme similar to but not totally comparable to that used for scalpels. In both systems the blade number indicates the shape of the blade and not its size. Some blades in both systems refer to a similar profile.
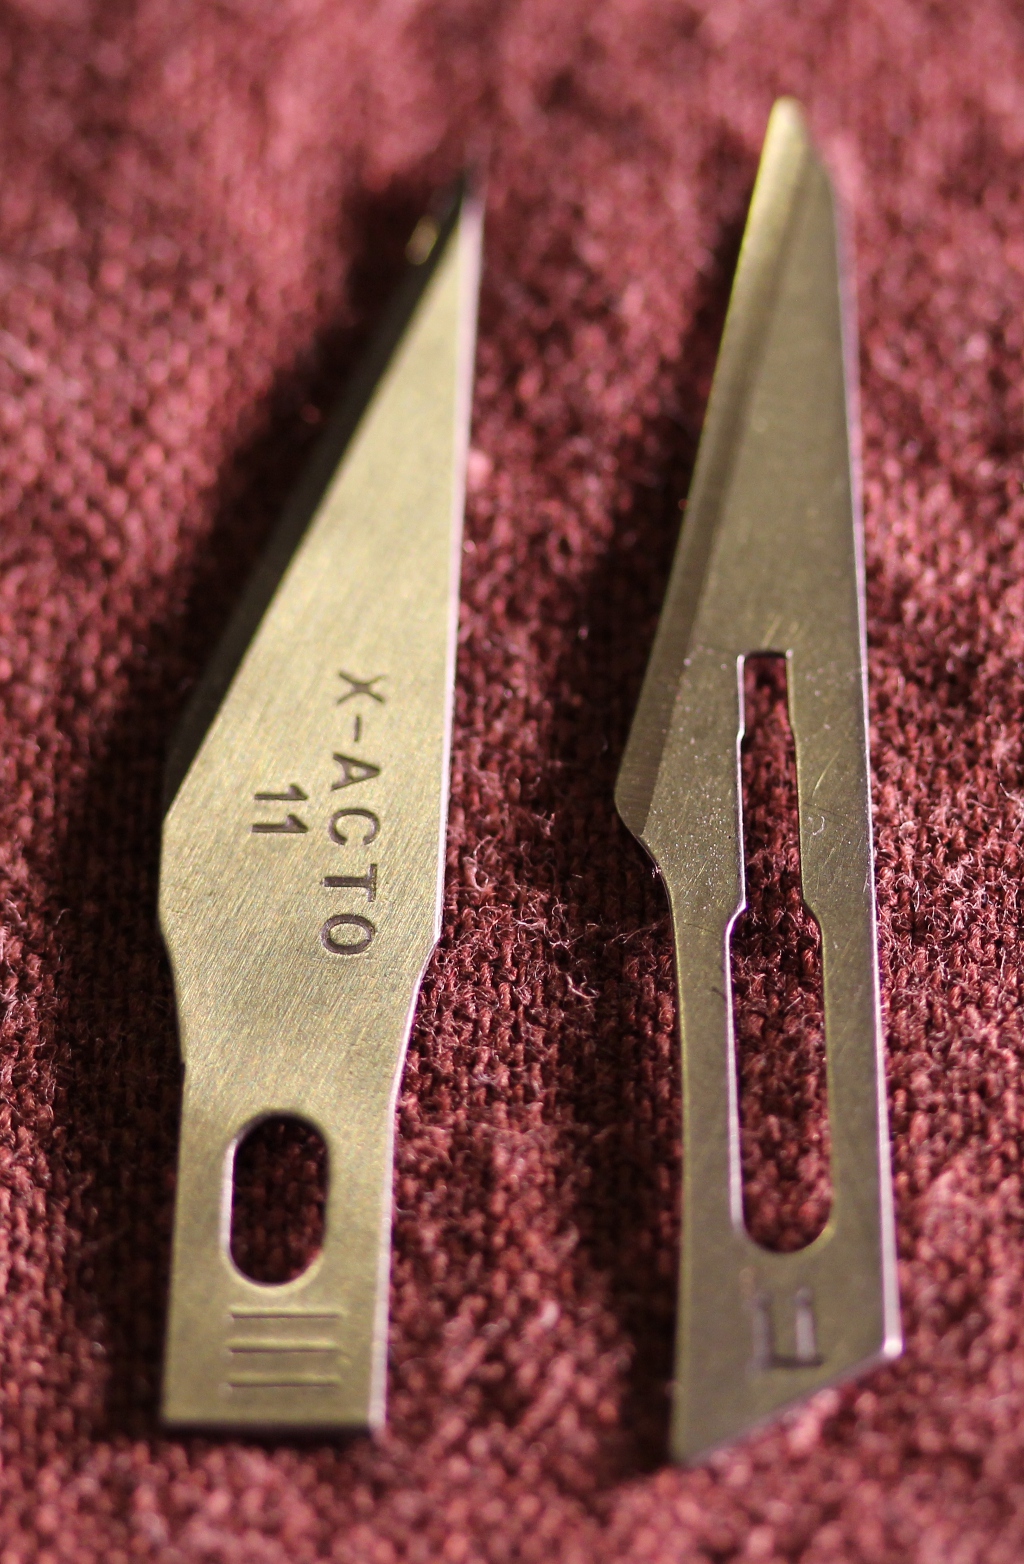 |
| Left: #11 X-ACTO Right: #11 scalpel. Notice the different attachment cutouts. |
The #10, #11, and #22 blades of both systems are comparably shaped. Some blade numbers do not match such as the #15 (which in X-ACTO is actually a saw) so be careful when acquiring direct replacements for your X-ACTOs.
Scalpels will come individually packaged in a sealed sterilized film. The sealed film alleviates the need for an oil film to protect the blade in storage (which is common with X-ACTOs) so there is nothing to clean off of a new scalpel before use.
If you want to give a scalpel a try go out and buy a #3 handle and some #10 (round point) or #11 (angled point) blades. There are many different profiles but most of the ones you will likely use in a crafting scenario will fit the #3 handle.
There are many stories whose plot involves an object compelling its owner to use it. If the object were something like a sword you would likely have either a horror story or murder mystery. I often think this is very true for tools. Once you have a hammer everything starts to look like a nail and nails exist to be hammered. As I own a variety of tools I occasionally find novel uses for them. This weekend it was the micrometer I heard calling. As this is a measuring instrument I needed something to measure. I decided this would be paper.

There is much paper at the Barnes and Noble so there I headed early on a Saturday morning to measure their great stocks of it. The looks from both patrons and clerks was interesting. I enjoyed trying to imaging what they thought I was doing especially as they likely had never seen a micrometer before.
I had thought there would be a great variety in the thicknesses of the paper between volumes but was surprised to discover there was not. Conventional paperback novels are basically low resolution ink holders made of natural fiber paper and came in at 4 thou (four thousandths of an inch or .004”) with exceptional examples as low as 3.5 thou or as high as 5 thou. Black and white graphic novels are thicker with an average thickness of 6 thou. Color content seems to be mostly printed on glossier paper using synthetic fibers to achieve a higher resolution with better color fidelity and averaged around 3 thou. Black and white content printed on synthetic media also tended to average around 3 thou.
Larger format items such as color how to guides or coffee table books were more varied. Almost all are full color and ranged from 3 thou to 5.8 thou in thickness.
In hindsight I suppose this is not surprising to find the thickness of the paper tied to its application. Keeping standards for paper thickness also allows manufacturers of printing equipment to make reasonable assumptions about what their systems must accept.
I do not cook, or bake, or execute any other from of food preparation beyond pouring cereal into a bowl milk. For this reason I am deficient in the realm of cooking implements. Thus when my sister arrived at my house with the intention of baking cookies in my oven I scrambled to find substitutes for the needed tools. The impending adventure led to some alternatives which I believed demonstrated greater usefulness than their traditional counterparts.
In the two years I had owned my house I had never used the gas oven. Little trust was placed in the oven’s metered dial indicating temperature and as there was no display of current temperature we would be unable to judge when preheating was complete.

My IR temperature gauge filled the role of thermometer admirably. In addition to the simple ability to register a temperature the meter may be aimed at different segments of the oven’s interior. This allows the user to find hot spots in the oven without laborious experimentation.
After the cookies were placed within the oven, whose preheating had been empirically confirmed, it occurred to us I was not in possession of any form of oven mitt. Various inferior and unimaginative alternatives were offered before I derived the ultimate solution.
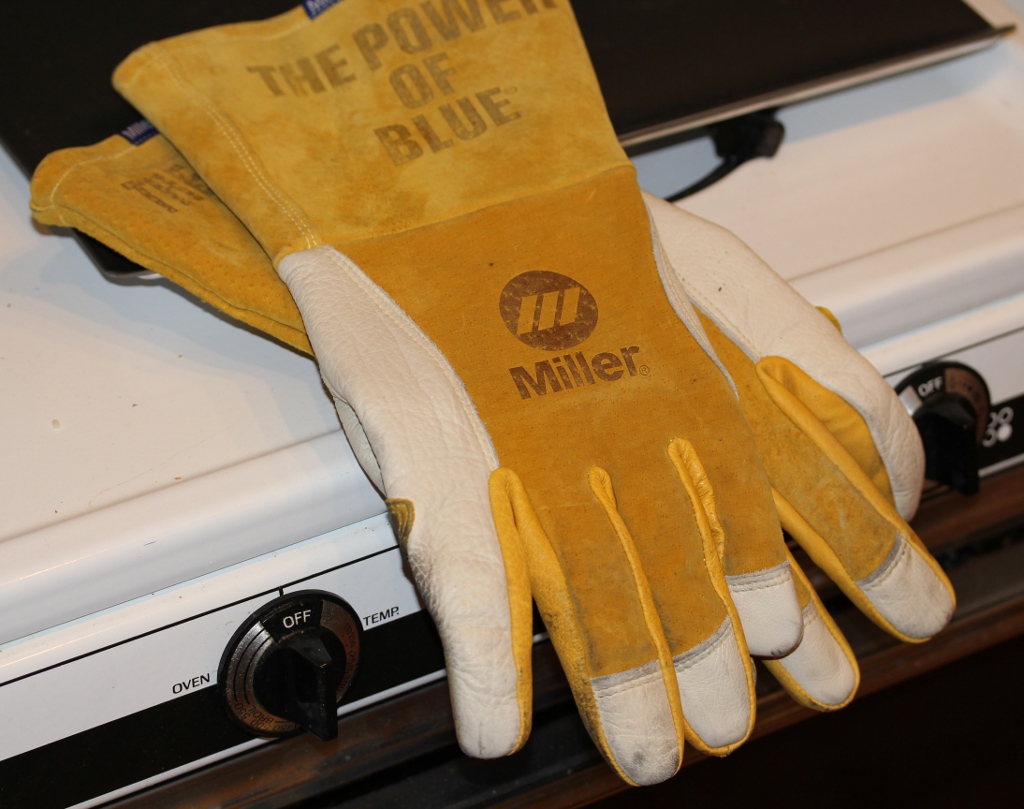
Welding gloves being designed to protect their user from molten metal proved most effective. So great is the insulation of these gloves the user may maneuver hot surfaces at a leisurely pace. There is no haste necessary to drop a hot item before the heat becomes unbearable. As quality gloves may be had for $25 I cannot imagine a case in which a conventional oven mitt would excel them.

Among the various loots I transported home after visiting my family for Christmas was a cake of most delicious construction. On arriving home I decided to cut the cake and store the individual pieces in the freezer. At this point I realized I had no implement which would neatly cut the cake. This was not a surprise for my expansive collection of power tools is inversely mirrored by my nonexistent supply of cooking utensils.
After some thought I decided to use dental floss. If wire cutting works for cheese, which is nominally more dense than cake, floss should work for cake.
This worked very well. The floss cut the cake easily and as its length is easily varied it is possible to cut the entire length of the cake at one time.

My original intent was to press the floss through the cake and then thread it out of one side at the bottom, thus cutting in one pass. This produced a cut edge so fine the icing seemed to reconnect after the floss had passed and so I drew the floss back up through the cake thereby cutting with the floss twice. The image shows the result of this double cut.